U.S. Department of Transportation
Federal Highway Administration
1200 New Jersey Avenue, SE
Washington, DC 20590
202-366-4000
As noted in past scans, the Finnish Road Administration’s (Finnra) Reference Bridge Program is noteworthy. Finnra uses 106 bridges and 26 steel culverts as a control sample or set of bridges from which it gathers baseline data using experienced in-house bridge inspection staff to fulfill a variety of needs. These needs include the following:
Finnra monitors data quality control through the following:
Finnish bridge inspectors are certified upon completion of a two-phase training program. The first phase consists of a 4-day theoretical course on bridge measures, structural behavior, deterioration, maintenance repair and rehabilitation (MR &R), Finnra’s bridge register (management system), conduct of the inspection, inspection methods, data, and quality control with a written examination. The second phase consists of 2 days: 1 day of training on the bridge site and a 1-day performance examination that includes a written test.
Inspectors must participate in yearly 1-day advanced training to renew their certification. Annual certification also serves as a calibration day for inspectors to ensure uniformity of assessments by all inspectors. The annual advanced yearly training day involves inspections of two bridges. The bridges used in the evaluation are rated beforehand by Finnra staff. The results provided after inspection to the candidate are compared to the baseline inspection. Finnra maintains records of each inspector’s annual test inspection in a central database, and reviews and rates the results to determine personal quality points for each inspector. These personal quality points are used in the selection process for bridge inspection services. Repeated weak test results can lead to loss of certification.
In addition to the above, each region’s bridge engineer is responsible for ensuring the skills of inspectors working in his or her region by making quality measurements. Every inspector involved in the inspections of the road region must participate in at least two control inspections during an inspection period.
Quality control inspections consist of general inspection of a structure. The actual number of quality control inspections conducted by an individual inspector varies, depending on the number of inspections he or she will perform during the period (table 4). The sample bridge must have at least 50 damage points (VPS).
| Number of inspected bridges | Number of control inspections |
|---|---|
| 1 ... 100 | 2 |
| 101 ... 300 | 3 |
| > 300 | 4 |
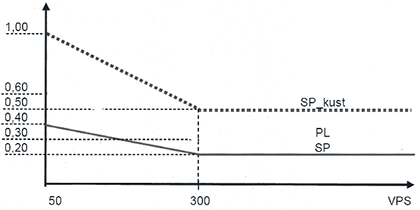
The Finnra regional bridge engineer chooses a bridge with known inspection results. The inspectors to be evaluated, who must have no previous knowledge of the bridge, inspect the bridge in the presence of the Finnra engineer. The Finnra engineer reports the results of the inspections in the bridge register as personal quality results of the candidate inspectors. An irregularity report is created if any inspector’s damage point deviation (PL), relative deviation (SP), or relative cost deviation (SPkust) in the quality measurement exceeds the maximum allowed values, as shown in figure 14.

Figure 14. Maximum allowed values for the deviation PL and relative deviations SP and SPkust.
Damage points (VP) are a function of the bridge structural part and the estimated condition of the structural part where the damage is located, the damage class, and the repair urgency class of the damage. The sum of damage points (VPS) describes the degree of bridge deterioration and the amount of damage, taking into account the length and the width of the bridge. The number is calculated from the sum of damage points assigned to nine main groups of structural elements.
Two quality parameters are measured: deviation (PL), calculated based on the damage points (VP), and relative deviation (SP), calculated based on the sum of damage points (VPS) or the sum of repair costs of the bridge.
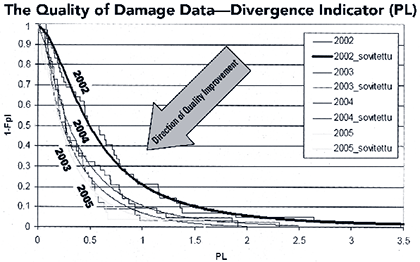
Finnra uses a variety of quality reports to support and assist quality control of the inspection program. Finnra has published quality reports yearly since 2002 in its internal report series. Review of the results of these reports on data quality during the past 3 years shows that the inspection data quality clearly improved after 2002, but it is partly better and partly worse than the 2003 data. Finnra believes that these reports have been invaluable in helping it identify needs for additional inspector training, revisions to inspection methods and procedures, and additional quality control activities (figure 15).

Figure 15. Plot of divergence indicator from Finnra quality reports.
PL = Σ |VPi00-Meani00| / ΣMeani00
SP = |VPSi - ΣMeani00| / ΣMeani00

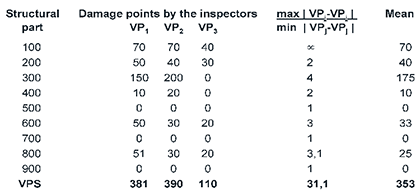
Figure 16. Example calculation of Finnra quality parameters.
Calculation of the deviation (PL) for the inspector 1 gives
PL = (0+10+25+0+0+17+0+26+0) / 353 = 0,22 < 0,3
and the relative deviation (SP)
SP = | 381-353 | / 353 = 0,08 < 0,2.
As a result, no irregularity report is needed.